Showing posts with label before and after. Show all posts

07 May 2009

vintage suitcase

i have a vintage suitcase that my grandmother used on her honeymoon and i can't think of how to use it...it doesn't quite go with the decor in my house, so i have been a bit stumped because it is something i love and would love to put to use.

i think i have an idea brewing after seeing these...

oops can't remember where i got the above image...

image from here, as seen on design*sponge

21 March 2009

fabric tufted ottoman

i love ottomans but they are just so darn expensive...here is a great tutorial on how to make one yourself for under $100! i am definitely keeping this in mind for the future...


$100


$60

you decide...
here's the tutorial!

14 March 2009

the baby crib - finally!

i finally got a picture of the crib i painted. it was given to me by my sister and had been used by 3 children previously and was 9 years old (at least...). it was in okay condition but starting to look very worn. plus, i really wanted a white crib for my baby. it was a TON of work to paint the crib, mostly because it was in pieces and so it was a slow process. but i am so happy with how it turned out!

the before crib...nice, but not in love with the wood...

the after crib...the white is called "whispering wind" and is more of a dirty white...i wanted it to be older looking...antique, if you will...


i still need to paint this dresser and glider, plus a changing table...so much work but it will be worth it! i'll post those pictures as i finish them (it helps me stay motivated to think..."i've got to post those pictures!")

20 February 2009

silhouette how-to

i searched and searched on how to make a silhouette and after spending hours trying to do it digitally, i finally decided to do it by hand. for me, this way was so much easier and not to mention much more efficient!

step 1: take a profile picture of the image you want to use for your silhouette. the subject should be the primary focus in the frame.


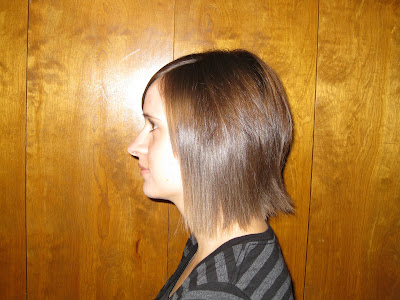
step 2: print the photo out. i printed these in a 5x7 size on regular cardstock. there is no need to use photo paper or to even have a great quality printout (as you can see, the ink was running out which was no problem at all!). next, cut the photo out very carefully so that you have only the profile left.


step 3: paint over the photo with black acrylic paint. usually only one coat is needed. it dries very quickly.


step 4: arrange your silhouette however you would like to display it and voila! you're done! it was that easy!


here is another example of a silhouette i did of my son at 9 months old:

this was the best profile shot i could get of him and it ended up turning out just fine. i had to do some extra trimming of his neck and chest but it worked.

...and, the final product:
(this silhouette was printed as a 5x7 as well. generally it seems that you would print the silhouette out according to the size of frame you'd like to put it in).

have YOU ever made a silhouette? if so, how did you do it and did you love the end result?

08 February 2009

bed frame makeover

i lied...i said next up would be the baby crib...but, when we went over to our house the other day (we are s-l-o-w-l-y moving in) we forgot all of the pieces to set it up...so, as soon as i get it put together, i'll post it on here - i'm so excited to see the finished product!

here's another project i have been working on...a bed frame...an ugly one with lots of potential. my parent's gave it to us because we didn't have a bed or a frame (it came from D.I.)...well so they gave us this frame and a full size bed. yes, a tiny full size bed - but it was free! so, this will be our bed for the next few years. i thought this frame would look beautiful painted in antique white so that's what i did. it was a big project mostly because of all of the spindles, but after sanding, priming, and painting 2 coats of paint, it looks great! i am SO happy with how it turned out!


{this is the bedding i found at target the other day for 50% off! it was so cheap! and i just love how it looks sort of vintage. it isn't super high quality but i am not a super high quality girl...i mostly just care about the price...if it's cute and the price is right, that's my kind of thing. it's all wrinkly because i had just taken it out of the bag because i couldn't wait to see how it looked on our new beautiful bed! i am in love!}

not too shabby of a makeover, right?

04 February 2009

hall table

here is my first ever refinishing project. i am so happy with how it turned out! it is robin's egg blue and very bright. i am going to use it as a hall table in our entry way.

this was a desk that my dad built about 45 years ago. it was one of his first ever woodworking projects. that is why this means so much to me! i have always loved this desk but it needed a little face-lift.

  • i bought a quart of paint which cost $10 - actually free with a left over giftcard to Lowe's from our wedding 2 1/2 years ago :) score!
  • i sanded (well, actually, my husband sanded) down the desk and then primed it with one coat of primer
  • i filled in the two holes with putty where i removed the original hardware
  • i put two coats of paint on
  • i lightly sanded the edges to give it a more vintage feel
  • attached a new piece of hardware that cost me just over $1 at Home Depot (i might get one at anthropologie eventually...they have really beautiful drawer pulls)
so...this project basically cost me next to nothing AND it has tons of meaning!

i decoupaged the inside of the drawer with SUPER cute paper - but, i can't get it open now! it is seriously stuck. i think the paint made it a tighter fit. it never opened very well anyway. but, i will try to get it open and when i do, i'll take a picture of the inside of the drawer because it's one of my favorite parts of this project.

my husband worked hard and got the drawer out so i could take a picture of the inside. cute huh! well, i think it is at least. you can see where the drill wore down some of the paper, oh well...it doesn't bother me so i'm not going to touch it up - the drawer doesn't work anyway. we sanded the paint down on the sides but it's still not a great fit so that drawer will just not be used. but - at least I know it's cute inside!

next up: the baby crib.
ohh. too much work. can you tell i'm having a hard time finishing it? it is taking so much motivation to finish because it's plain old annoying.